10 Best Battle Rope Workouts for Beginners (Step by Step Guide)
Ropes have been an integral part of the advancement of human history, as both a tool and a way to amplify human strength. Some historians trace the history of ropes to predating bronze, clay, steel, and iron. While it has existed as a tool implemented in a variety of ways in human history, its use as a tool to advance human performance is a recent application. In 2006, John Brookfield developed the system "Battle Ropes" in his backyard to increase work capacity and mental toughness.
In comparison to other modalities and their use for optimizing human performance, battle ropes are some of the newest tools. Battle rope workouts are incredibly effective in building strength, endurance, and cardio. Battle ropes are cheap, easy to set up, and allow you to perform several workouts from the comfort of your home. They help in building strength by incorporating a wide range of different muscle groups. These battle ropes can be used for upper and lower body exercises, depending on which muscles you wish to target.
If you're looking for effective ways to incorporate a battle rope into your workout, read this guide to learn about the best battle rope workouts and how to do them.

Types of Exercises with the Battle Rope
Battle Ropes can be used in a variety of ways with each implementation providing a different stimulus and thus a different adaptation. They are:
- Wave Exercises: Using waves to move the body through various, simple, or complex ranges of motion and planes of motion. Increasing or decreasing wave speed, wave size, wavelength, rope thickness, and rope length will increase or decrease the force generated and load through the movement pattern.
- Pulling Exercises: Using rope wrap around an anchor to create varying loads of force through the body, in various movement patterns and body positions.
- Static Exercises: Using a static rope to engage the body isometrically or dynamically in a differing line of load than gravity.
Benefits of Battle Rope Training
- High Reward/Low Risk: If the focus is strength adaptation and power output, there are few greater tools for creating adaptations in a way that is safe and with limited risk. In other words, a client/athlete can either create the force necessary to move the rope or they cannot.
- Visual representation of force: The wave created in the rope represents the ability to create force and level of force created. You can visually see the force created. This feedback mechanism can only be found in the battle rope.
- Builds contralateral brain/body connection: Specifically, the movement of alternating waves trains similar sling systems and contralateral movements of the human movement system like running and throwing.
- Grip Strength and Endurance: Whether it is a 1.5" or 2" battle ropes, both will challenge your grip, a commonly weak aspect for clients/athletes. The undulation of the rope creates a greater demand on your grip than traditional modalities. Grip strength is an important factor in shoulder health and overall circulation.
- Freedom to move: Battle ropes training allows for safe and effective ways to train force production in all three planes of motion, as an integral part of any well-rounded strength and conditioning program.
- High Level of Core Activation: If you are looking for a tool that recruits multiple core musculature in movements, then the Battle Rope is that tool. High to moderate levels of activation have been found in obliques, erector spinae, and gluteus medius.
- Aerobic capacity improvements with limited locomotion: Have someone with a lower body injury or chronic pain limiting movement? The battle rope exercises have been shown to improve aerobic capacity and provide a way to improve health markers of the cardiovascular system.


Battle Ropes Training Rules to Swing By
Battling ropes are useful tools, but you won't get anywhere if you just flail away aimlessly. If you're going to pick up a rope, live by these rules to make the most of your workout.
Move in Many Directions
Don't just wave the ropes up and down. The key to their effectiveness is that they work each arm independently, eliminating strength imbalances as they sculpt your muscles. Try different motions to work different muscles and skills.
Going from side to side, for example, places more emphasis on your hips and core, building total-body stability. Moving the ropes in circles improves shoulder mobility and range of motion, boosting athleticism and reducing your risk of injury. Switching among different motions in your training sessions will help you sculpt functional real-world strength.
Use Ropes for Everything
Lots of guys use battling ropes as a finisher or as one exercise in a larger circuit. But ropes also make for a great workout in and of themselves. You might do each exercise for 10 minutes, for example, or do waves alone for a full 20 minutes. Doing one task for extended periods teaches your mind to focus and helps your body flush lactic acid. It also extends the time your muscles are under tension, helping you build strength as you shed fat.
Adjust the Resistance
The amount of slack in the rope determines the load. Moving away from the anchor point decreases exercise intensity, while stepping toward the anchor point increases it. Adjust the slack so you're challenged to complete each set. If you're doing a battle rope workout, alternate between two minutes closer to the anchor point and one minute farther away. The time you spend farther from the anchor is active recovery.
Move With Intent
With other free weights, like dumbbells and kettlebells, we're accustomed to controlling our movements, and that typically involves moving slowly. When it comes to working on power with battle ropes, that means moving through each rep fast and hard. With battle ropes, it's all about intention in speed and power. If you're half-heartedly slamming the battle ropes, you won't gain much from the movement. Submit to each rep and make each one count.
The Best 10 Battle Rope Workouts for Beginners
Battle ropes are a great way to get in a full-body workout. They can help you develop endurance, strength, and speed. Battle ropes are also great for getting an intense workout in a short amount of time.
Battle ropes can be used for a variety of workouts. If you're just starting out with battle ropes training, you may consider these 10 best battle rope exercises for beginners. These battle rope workouts are easy to follow and will help you get started with your personal fitness goals.
1. Jumping Slam
Battle rope jumping slams are a great way to build strength in your legs and burn out your core. They're great for building strength and endurance in your legs, but they also work your core and back muscles.
- To start, stand in front of your battle rope with your feet shoulder-width apart, facing the rope.
- Hold the battle rope in both hands and get into a squatting position.
- Raising your hands overhead, jump high into the air.
- It's important to keep your core tight so that you don't land on your tailbone or injure your back.
- Once you have landed in a squat, smash the ropes forcefully onto the floor in a wave motion

2. Jumping Jacks
Battle rope jumping jacks is a great way to get your heart rate up. These simple movements will help you burn calories and improve your endurance. This is a great battle rope workout for beginners, especially if you're just starting out with battle ropes.
- Start in a standing position with feet together and hands at your sides.
- With your palms facing each other, hold the battle ropes with a side grip.
- Lift your arms to shoulder height as you jump a little wider than shoulder-width apart. Make sure your elbows are slightly bent while keeping your arms straight. Utilize the momentum of the continuous jumps to lift the ropes high!
- As you jump inwards, bring your feet together again and slam the ropes down to your sides.
- Repeat this motion for 30 seconds or more, depending on how much time you have available or how motivated you feel!

3. Battle Rope Snakes
Battle rope snakes is one of the great gym workout exercises that targets your abs, shoulders, upper back and lower traps. It also involves biceps and forearms and quadriceps.
- Hold the battle rope in each hand. Slightly bend the knees and maintain a tight core.
- While maintaining your hands at core level, start the movement by bringing the ropes out to the respective sides. The right side of the rope will go to the right side while the left rope will go to the left side.
- In the next step, bring the ropes towards one another and immediately back out.
- The movement will be similar to a slithering snake.
- Continue performing this movement multiple times.

4. Russian Twist Wave
Battle rope russian twist wave is the best rope workout for your core. It builds strength in your obliques and lower back muscles.
- Put yourself in a seated position on a mat or floor.
- Position yourself in an upright position facing the ropes. The back of your body should be slightly tilted backward while sitting straight. Using this technique will help you engage your core. Avoid touching your ears with your shoulders. Keep them back and down away from ears.
- Maintain a slight bend in your knees while keeping your heels grounded. Place the battle ropes close together at the midline of your body.
- While looking ahead, slam the ropes to both sides of your body while keeping your arms extended, and elbows slightly bent. Control the movement by rotating your torso just a bit.

5. Plank Waves
The plank waves exercise rope workout is a simple but effective way to strengthen the deep muscles of your core. It activates all your upper body muscles as the rope moves up and down. It's hard to believe that just one battle rope workout can make such a big difference, but it really does! Try it out - you'll be amazed at how much stronger you feel in just a few sessions.
- Start in a high plank position, hands directly under your shoulders and resting on the ground.
- Straighten your back and engage your core.
- Grasp the workout rope with one hand. Take a side grip on it. Pull your belly button into your spine and slightly protract your shoulder blades prior to starting. Maintain a square posture at the hips and shoulders.
- While keeping your arm straight and your elbow slightly bent, start whipping your rope up and down to create a lateral wave. Avoid wiggles in your hips by squeezing your glutes and engaging your core.
- This movement must be constant throughout the exercise.

6. Alternating Waves
This rope exercise is perfect for people who want to get a full body workout in a short amount of time. It mainly targets your shoulders while also challenging your arms and core. The alternating waves workout helps build muscle!
- Maintain an elevated hip position while bending your knees.
- Ensure that the back is straight and the chest is elevated.
- As you hold one end of the battle rope in each hand, extend your arms forward while maintaining a slight bend in your elbows.
- As you begin, lift your left hand and lower your right hand.
- Now lower the left hand and then simultaneously raise the right hand. Keep the core tight as you repeat this back-and-forth motion.

7. Figure 8
It's a great way to target obliques without having to do any crunches or sit-ups. Try it out!
- Keeping your core tight, bring both hands across your body on the left side and down.
- Moving arms across your body, move the battle ropes upward and then down to your right side.
- In the same manner, raise the ropes, and slam down to the left.
- Consider drawing an infinity sign using the ropes.

8. Sidewinders Walk
Sidewinders walk is the best battle rope fitness if you want to build upper body and core strength. This battle rope workout is also known as side-to-side waves and targets your entire body.
- To start this battle rope workout, swivel your hips side to side. The idea is to keep your transverse abdominis activated to stabilize the core.
- Swing the rope across the floor from left to right just like you were sweeping the floor
- Make sure your toes are firmly planted onto the ground while allowing your heels to raise and lower slightly.

9. Reverse lunge Wave
The reverse lunge waves is a high impact battle rope exercise that will help you get your heart rate up and burn calories. Working out with battle ropes is a great way to build strength in the shoulders, arms, and core.
- Hold a rope in each hand with the ends held firmly between your palms.
- Perform alternate waves with your battle ropes as you step back into a reverse lunge.
- Return to standing, but keep your arms moving as you step into a reverse lunge on the opposite leg.
- Repeat for reps as needed.

10. Rope Slam
The battle rope slams help to build up your upper body strength. It helps to make your shoulders, arms, and chest stronger. Another benefit of this battle rope workout is that you will also be able to improve your endurance as well as your cardiorespiratory fitness.
- Hold battling ropes with palms facing inward, while standing feet shoulder width apart.
- Swing rope high above your head, then slam down into a high squat while using explosive movements.
- The rope should be above your ears at its high point and below your knees at its low point.

How Long Should A Battle Rope Workout Be?
The most common duration used by fitness experts is 10-15 minutes. It's important to remember that how long you do the exercise is less important than how hard you push yourself during those 10-15 minutes.
You may not be able to handle a 10-minute workout initially, but that's ok. You can start with a 5-minute workout and eventually extend it to 10 minutes.
Researchers found in a study that a 10-minute battle rope workout results in increased heart rates and energy expenditure (calorie burn) that met previously established thresholds for improving cardiorespiratory fitness.
Conclusion
Gym workout with ropes offers an exciting, efficient way to build strength, burn fat, and improve endurance—all without needing complex equipment or advanced skills. These 10 beginner-friendly workouts are a perfect starting point to master the basics, boost your confidence, and kickstart your fitness journey. Stick with it, focus on good form, and you'll be surprised how quickly your power and conditioning improve—one wave at a time.
What Is a Barbell Hip Thrust?
A barbell hip thrust is a lower-body strength training exercise defined by lifting your lower back and torso with your knees bent and your upper body resting on a bench. With proper form, the barbell hip thrust works muscle groups across your entire lower body, particularly the gluteal muscles.
Targeting and engaging the gluteal muscles more than other lower body exercises due to its horizontal movement, thus helping build and strengthen your glutes. It also enhances mobility of the hip joint, which plays a role in several movements in sports and in daily activities. Through enhancing power and explosiveness, hip thrusts are useful in improving athletic performance, particularly in sprinting speed, jumping height, and overall lower body strength. Additionally, they assist in minimizing risk of injury in the lower back and knees through enhancing the muscles that support these two body parts. This is why they play a significant role in performance and safety.
- Also Known As: Hip thruster, weighted hip bridge, weighted glute bridge
- Targets: Gluteus minimus, gluteus medius, gluteus maximus, hamstrings, adductors, and quadriceps
- Equipment Needed: Barbell, weight plates, dumbbell, or kettlebell
- Level: Intermediate
Guide to Performing Hip Thrusts
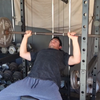
The most widely practiced version of the hip thrust requires you to maintain your balance on a weight bench while holding a barbell on your hips. Getting into and out of the position may be awkward when you are new to the exercise. It may be helpful to work with a partner or a coach when you first try this move. You can also try the move on the floor before using a weight bench. If you use the weight bench from the beginning, practice the movement with no weight before adding resistance.
For safety, be careful to set up your weight bench properly when you do the hip thrust workout, especially if you plan to lift a lot of weight. Make sure that the bench you use is no higher than your knees. The long end of the bench should be positioned against a solid surface like a wall so that it cannot move while you are lifting.
Also, you may want to use a pad or sponge on the bar. Position the pad on the center of the bar so that both hip bones are protected. Some exercisers use a towel, but a towel can slip and is less secure.
If there is no bench available and your gym doesn't have a thruster, you can use an exercise step with 4 or 5 risers. After the bench is set up, you'll want to load the bar with weight. Always secure weight plates with a barbell collar.
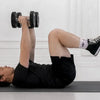
How to Do Hip Thrusts
- Start seated on the floor, knees bent, feet slightly wider than hip-distance apart. The toes can be turned out just slightly. The upper back (lower scapula) should be resting against the edge of the weight bench in the center of the bench.
- Place the weight bar across the hips. Hold onto the bar to keep it in place, but do not use your arms to lift it.
- Squeeze the glutes and press the bar straight up until the hips are in line with the shoulders and knees. The bench should be supporting the mid-scapula area. Keep the core tight and maintain a slight chin tuck with your focus down your body (a few inches above the bar).
- Slowly lower the bar down until the hips are just a few inches off the floor.
- Squeeze the glutes and lift again.
Common Hip Thrust Mistakes
There are a few common blunders to avoid when performing the hip thruster. Mistakes could lead to a less effective outcome and potentially to neck or back problems.
Incorrect Foot Placement
Many coaches tell their clients that they can find a foot position that feels most comfortable for them. However, the placement of your feet can affect how active different muscles are during the thruster. Moving the feet wider or more narrow is not likely to make a big difference, but moving the feet further away or closer to the body may change how this exercise feels.
If you feel like your quadriceps muscles (the front of the thigh) are working too hard, your feet may be too close to your hips. Moving them further away from the body will help to shift the workload to the hamstrings and glutes. Moving them too far away will minimize the glutes and emphasize the hamstrings.
Lazy Neck
Your focus is important while performing the hip thrust exercise. The upper back is supported by the weight bench, but the neck and head are not. So it is possible to drop the head back and look at the ceiling while lifting the hips. But this can encourage overarching through the spine, so it is not recommended.
Instead, keep the chin tucked down towards the chest while lifting the hips into extension. This helps to keep the core engaged and prevents you from arching the torso and overextending through the spine.
Incomplete Extension
If you are lifting too much weight, or if you have very tight hip flexors, it is possible to lift the hips partially but not to reach full extension with the hips in line with the shoulders and knees. This will shortchange you of the most effective part of this exercise.
To reach full extension, lower the amount of weight slightly and see if you can get the hips fully extended. If the hips still aren't getting high enough, your hip flexors may be too tight. Try doing bridge exercise on the floor to open up the hip area before doing the thruster.
Lowering Too Quickly
Both the concentric (lifting) phase and the eccentric (lowering) phase are important during the hip thruster exercise. Some people put substantial effort into the lifting segment and move quickly through the lowering phase to start another repetition.
But to make the most of this fitness thrust, you want to control the eccentric phase. Take as much time lowering the bar as you do lifting it. It will force the glutes to stay engaged and work harder.
Hip Thrust Muscles Worked
Primary Muscles Targeted by Hip Thrusts
The primary muscles worked by hip thrusts include the gluteus maximus, hamstrings, and quadriceps. These muscles play crucial roles in hip extension, stability, and overall lower body strength.
Gluteus Maximus
The gluteus maximus is the largest and most powerful muscle in the gluteal group. It is the primary mover in hip thrusts, responsible for hip extension and playing a critical role in generating power and strength in the lower body. Strengthening the gluteus maximus can enhance athletic performance and improve overall lower body strength.
Hamstrings
The hamstrings assist in hip extension and provide stability during the hip thrust movement. These muscles are essential for maintaining proper form and preventing injury. Strong hamstrings contribute to better lower body strength and performance in various activities.
Quadriceps
The quadriceps support the upward thrust and help stabilize the knee joint during hip thrusts. This muscle group is crucial for maintaining proper form and preventing strain on the knees. Strengthening the quadriceps can enhance lower body strength and stability.
Secondary Muscles Worked by Hip Thrusts
In addition to the primary muscles, hip thrusts also engage several secondary muscles that play supporting roles in the movement.
Adductors
The adductors help stabilize the hips and assist in the upward motion of the hip thrust. These muscles contribute to better hip stability and overall lower body strength.
Core Muscles
Engaging the core muscles during hip thrusts helps maintain stability and support the lower back. A strong core is essential for performing the exercise correctly and avoiding injury.
Hip Flexors
The hip flexors play a supporting role in the movement, helping to control the descent and ascent of the hips. Strong hip flexors contribute to better hip mobility and overall lower body strength.
By understanding the muscles worked by hip thrusts, you can optimize your workout routine to target these muscle groups effectively, promoting greater gains in strength and development.
Core Benefits of Hip Thrust
1. Enhances Athletic Performance
Weighted hip thrust is an effective lower body exercise since they enhance the horizontal force production that is vital for athletic performance particularly in regard to activities such as running and jumping. This exercise increases the power and speed of hip extension, which may lead to improved performance in sports and other exercises involving explosive movements. Also, enhanced glute strength and stability resulting from hip thrusts enhance overall body function and aids in injury prevention.
2. Improves Posture
Hip thrusts also help to enhance posture since it involves the strengthening of muscles that form the foundation of the pelvis and the lower back. This means easier pain prevention and fewer cases of chronic pain and spinal misalignment that are associated with prolonged sitting and poor body mechanics.
3. Easier Daily Activities
Due to the strengthening of the glutes and hamstrings, thrusting can help you perform simple tasks better. You'll be able to walk without as much difficulty, get upstairs, and lift easier. This exercise enables the body to improve its mobility, thus making daily living activities easier.
4. Increased Bone Density
They're also a form of resistance exercise which means that they assist in building the strength of your bones. This is because they help in avoiding diseases that weaken the bones such as osteoporosis. Better bones imply that if you fall, your bones will not easily get fractured.
5. Pelvic Health and Mobility Improvements
Hip thrusts also have an important role in enhancing pelvic stability and movement, which is useful in activities such as running and jumping. Improved pelvic stability means better movement efficiency and reduces risk of injury.
6. Strength and Stability Improvements
Hip thrusts effectively strengthen the lower body and core muscles, thus making you more balanced. This enhanced strength assists in many functions in our daily life, be it in sports or any other activity. Muscles that are stronger can help your body inwards prevent many injuries from occurring and enhance your health in general.
Hip Thrust Techniques for Beginners
For those still learning how to do hip thrusts, you can start doing machine-assisted hip thrusts so that you'll be able to perform it with proper form. Hip thrust machines are great for newbies as they offer a stable environment in case balancing weights on your hips causes you to struggle with balance and stability.
- Safety: Hip thrust machines guide movements, reducing the risk of improper form and injury, making them ideal for beginners.
- Ease of Use: Adjustable resistance allows beginners to start with lighter weights and gradually increase as they gain confidence and strength.
- Gradual Progression: Controlled resistance helps build strength steadily. As you progress, you can increase the resistance to continually challenge your muscles and promote growth.
Advanced Techniques to Enhance Muscle Activation
Once you've mastered the basics of hip thrusts, incorporating advanced techniques can help you further enhance muscle activation and achieve greater results. These techniques involve using different types of resistance, varying your foot placement, and implementing progressive overload strategies.
- Using Different Weights: Use dumbbells, barbells, or the smith machine to vary angles and intensities for comprehensive muscle development.
- Progressive Overload: Gradually increase weight or resistance to continuously challenge your muscles, essential for growth and strength.
- Foot Placement Variations: Adjust foot placement to target different muscles. Wider feet target adductors and gluteus medius; closer feet focus on quadriceps and hamstrings.
To incorporate these advanced techniques into your hip thrust routine, start by gradually increasing the weight or resistance and experimenting with different foot placements. Ensure that you maintain proper form and technique to avoid injury and maximize muscle activation.
By implementing these advanced techniques, you can take your hip thrust workouts to the next level, promoting greater muscle activation and achieving more significant gains in strength and development.
Conclusion
The barbell hip thrust is a powerhouse movement for anyone looking to develop strong, shapely glutes and build a more explosive, injury-resistant lower body. Whether you're a beginner starting with a hip thrust machine or an advanced lifter adding serious weight to a barbell, this exercise delivers incredible glute activation, supports hip health, and improves overall posture and performance.
Ready to take your lower body to the next level? Make the barbell hip thrust a regular part of your training plan and experience the true benefits of a well-rounded, science-backed glute workout.
Best Home Gym Gear in RitKeep
These are our most popular home gym machines — combining Smith Machine and Power Rack in one. Perfect for both guided and free weight training to support your everyday fitness goals.

PMAX 5600 All-In-One Smith Machine - Integrated Weight System
✔️ 6 IN 1 Gym Station
✔️ With 75 KG Weight Stack On Each Side
✔️ Feel the Burn Through 80+ Exercises

PMAX 4750 Dual Plate Loaded Multi Functional Smith Machine
✔️ Fuel Your Workout with 100+ Exercises
✔️ Dual Independent Pulley System
✔️ Removable Jammer Arms & Leg Extension

Destroyer M10 ALL-IN-ONE Home Gym Power Rack With Pulley System
✔️ Crossover Cable Pulley System
✔️ Heavy-Duty Multi-Functional Rack
✔️ Offering over 80+ exercises


)